DIY: Yoga Mat Bag

Well, it's official. My best friend and I are going to a yoga retreat in western Massachusetts for a few days in June.
I can't wait!
It's costing us around $530 each for lodging and food for three nights and four days. Since that felt a little hefty, we opted not to take any additional classes. We're just going to attend the free yoga and mediation classes.
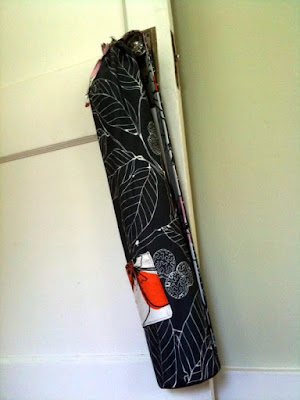
Since I like making something for myself before going on a trip, I decided to make myself a bag for my yoga mat. I've never had one before, and I figured it was time to stop carrying my mat under my arm.
I looked at patterns in two different books for inspiration. Simple Sewing had a pattern for a yoga bag, but I didn't like the non-circular bottom. My crafting partner, Katie, suggested that I consult In Stitches to look at their laundry bag pattern, which does have a circular bottom.
Since I hate, hate, hate reading patterns, I pretty much improvised a very simple pattern. Here's what I did:
- I used my rolled up yoga mat to estimate the right size for a large rectangular piece of fabric (P.S. All the fabric was leftover IKEA fabric from other projects).
- I used a plate from my cupboard to cut out a circle for the bottom.
- I cut two long rectangles for the strap. I sewed them right side to right side (along the two long sides) and then flipped it right-side-out and ironed.
- I made a pocket for my keys (with a velcro enclosure) by sewing a piece of velcro to the inside of the pocket, putting two right-sides together, sewing around three sides, flipping it right-side-out, and sewing it onto the rectangular piece (closing up the last side as I attached it) after I sewed the corresponding velcro piece to the rectangular base.
- I sewed the long rectangular base closed along the side.
- Then I put the strap between the circular bottom and the rectangle and sewed the circle on (after stay stitching around the circle and then cutting out small notches to get the circle to connect more flatly to the rectangle).
- At the top of the rectangle, I sewed two button holes, opened them up with a seam ripper, and then folded it over twice (with the top of the strap inside) to make the casing.
- Then I used some extra fabric to make a draw string.
- Finally, I used a safety pin to thread the draw string through the casing.
Of course those nine steps make it sound a lot easier than it actually was. I didn't spend enough time thinking through the steps of my improvised pattern before I began, so I messed a lot of things up. A lot. I had to use the seam ripper to undo a lot of my work. A lot.
Despite my frustration, I was glad I went back with the seam ripper to get everything right (I almost settled for having the seam on the opposite side of the strap which would have put the seam front and center on the bag). Having my friend Katie there (she was working on a baby hat) really helped. She wouldn't let me settle for a warped bag!


6 comments:
Hello from "Flying Lessons" :) Your yoga retreat sounds awesome...hope you have a wonderful time! Love your yoga bag!
Looks great!
Amy Butler also offers a free pattern for a yoga bag:
http://www.amybutlerdesign.com/products/free_patterns.php
@ Julie: Thanks for sharing! I love Amy Butler's free patterns, but I had never seen that one before.
Great Idea! I too make up patterns in my head and have to use the seam ripper. There has to be an easier way but I like to work through the problems.
Seam rippers can definitely be your friend! And it looks lovely, you blow me away that you didn't do that with a pattern, it looks fantastic!
Hey Sara- I spent three days at Kripalu with one of my best friends last year, and it was absolutely wonderful (we just took the free classes as well, and had more than enough to do!) I hope you love it as much as we did. (Also, there are tons of mats in each classroom if you decide you don't want to carry yours across the country!)
Post a Comment